Affiliate Disclosure: As an Amazon Associate I earn from qualifying purchases. Links to Amazon products are affiliate links that support this site at no additional cost to you.
The Complete Winterization Checklist
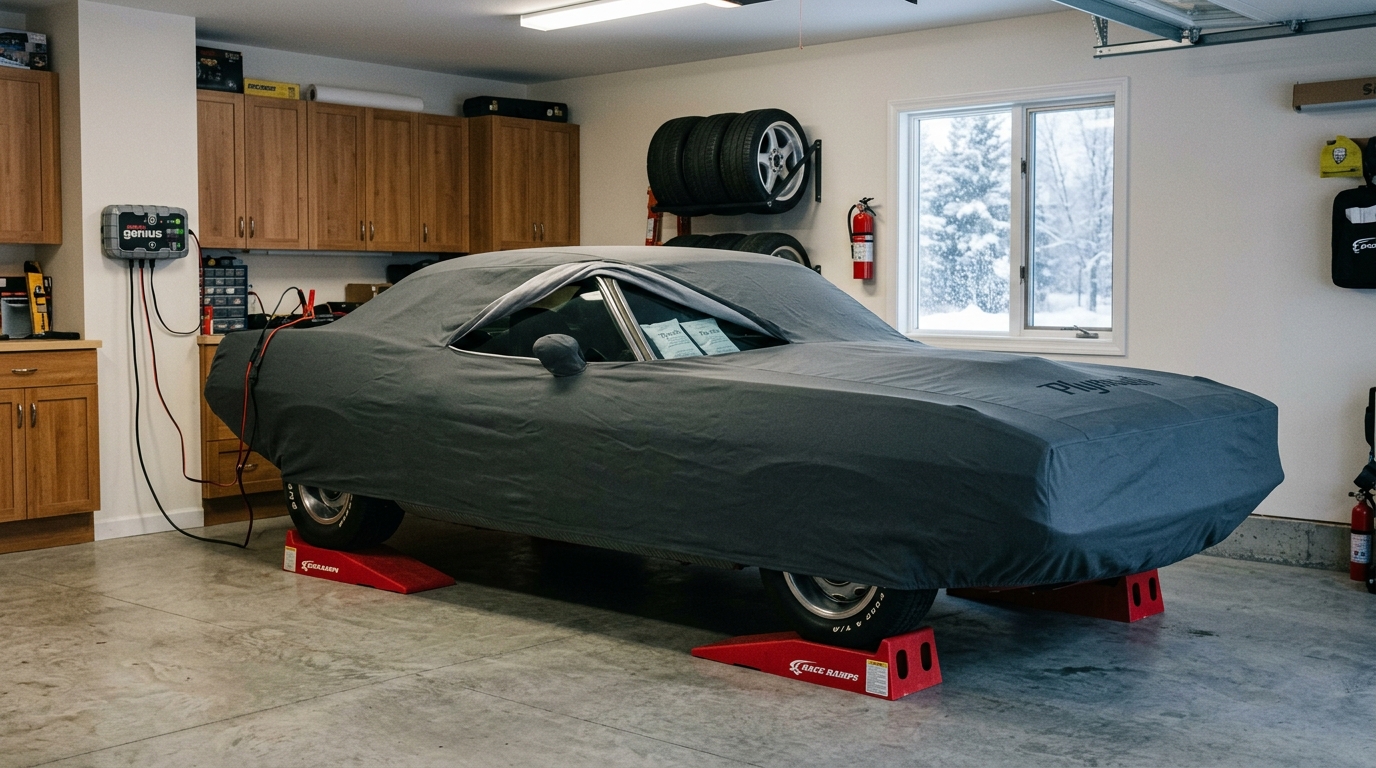
Winter storage is the single highest-risk period for a classic car. Moisture, temperature cycling, inactivity, and rodents each attack different systems — fuel, battery, metal, tires, interior, and wiring. The checklist below covers every system that degrades during storage, in the order you should address them. Each step includes the mechanism of degradation so you understand why the step matters, not just what to do.
| Step | Why | Timing | Product Category |
|---|---|---|---|
| 1. Fuel stabilization | Gasoline oxidizes in ~30 days; ethanol absorbs moisture and phase-separates | Before final drive | Fuel stabilizer (STA-BIL Storage) |
| 2. Battery maintenance | Self-discharge ~5%/mo; sulfation below 12.4V is permanent | At storage onset | Battery maintainer (NOCO GENIUS1) |
| 3. Underbody corrosion protection | Bare metal and road salt residue cause rust during temperature cycling | Before storage | Lanolin coating (Fluid Film) |
| 4. Tire flat-spot prevention | Tires flat-spot after ~30 days; worse in cold and on bias-ply | At storage onset | Tire saver ramps or max pressure |
| 5. Moisture control | Condensation in cabin/trunk causes mold and electrical corrosion | At storage onset | Silica gel desiccants |
| 6. Covering | UV and dust protection; breathable material prevents trapped condensation | After wash | Breathable cover (Budge Lite) |
| 7. Rodent prevention | Wiring insulation damage is a leading storage insurance claim | At storage onset | Entry blockers + traps |
| 8. Pre-storage wash | Contaminants left on paint etch into clear coat over months | Before covering | Iron remover + microfiber |
Winterization checklist: 8 steps in recommended order of execution. No affiliate links in this table — product recommendations appear in each step section below.
Step 1: Fuel Stabilization
Gasoline is not a stable compound. Untreated fuel begins oxidizing within approximately 30 days as lighter hydrocarbons evaporate and heavier components form gums and varnish that coat fuel lines, injectors, and carburetor jets. Ethanol-blended fuels (E10, present in most pump gas) are hygroscopic — they absorb atmospheric moisture from the air inside your tank. When enough water accumulates, the ethanol and water separate from the gasoline and sink to the bottom of the tank as a distinct layer. This is called phase separation, and it causes corrosion, starting problems, and lean running that can damage an engine on the first spring startup.
The fix is to add a fuel stabilizer before your final drive, not after the car is parked. Pouring stabilizer into a tank and letting it sit does nothing — it needs to circulate through the fuel system to protect the lines, pump, and carburetor or injectors. Add the stabilizer, then drive the car for 15–20 minutes at operating temperature so the treated fuel reaches every component. Fill the tank to 95%+ capacity to minimize the air space where condensation can form.
STA-BIL Storage Fuel Stabilizer, 32 oz
STA-BIL Storage is formulated specifically for long-term storage (up to 24 months), unlike generic stabilizers that target only 30–60 day protection. The 32 oz bottle treats up to 80 gallons — enough for multiple vehicles or seasons. Add it before the final drive so it circulates through the entire fuel system.
View STA-BIL Storage 32oz on AmazonStep 2: Battery Maintenance
A lead-acid battery self-discharges at approximately 5% per month at 70°F — and faster in warmer environments. As voltage drops below 12.4V, lead sulfate crystals begin forming on the plates. This process, called sulfation, is initially reversible but becomes permanent after weeks or months of low-voltage storage. A battery left disconnected in a stored car will typically be dead or permanently damaged by spring.
The critical distinction is between a trickle charger and a battery maintainer. A trickle charger delivers a fixed amperage continuously — it does not monitor battery voltage or taper its output. On a fully charged battery, a trickle charger will overcharge, boil the electrolyte, and vent hydrogen. This destroys flooded batteries over months and is catastrophic for AGM and gel batteries. A maintainer (also called a tender) monitors battery voltage and switches between charge, float, and standby modes, keeping the battery at 100% without overcharging.
NOCO GENIUS1 1-Amp Smart Battery Charger & Maintainer
The GENIUS1 is a maintainer, not a trickle charger. It monitors voltage and adjusts its output across charge, float, and standby modes — it will not boil an AGM or gel battery. At 1 amp it charges slowly enough for long-term connection, and it works on 6V and 12V batteries (relevant for pre-1955 vehicles with 6V systems). Adding this to your cart alongside the fuel stabilizer and desiccants crosses the free-shipping threshold and extends the affiliate cookie from 24 hours to 89 days.
View NOCO GENIUS1 on AmazonStep 3: Underbody Corrosion Protection
The underbody is where winter storage does its most expensive damage. Road salt residue, moisture from concrete floors, and temperature cycling combine to accelerate rust on frame rails, floor pans, suspension components, and brake lines. Even if you washed the car before storage, salt and moisture settle into seams, crevices, and boxed frame sections where they cannot be reached by washing.
The counter-intuitive truth about undercoating: rubberized undercoating is the wrong product for winter storage. It goes on as a thick, tar-like layer that hardens over time. As it hardens, it cracks from temperature cycling and chassis flex. Those cracks channel water and salt directly against bare metal while trapping it there — the coating becomes a moisture barrier against the wrong side. Lanolin-based coatings behave completely differently. Lanolin is a natural wool wax that remains soft and pliable indefinitely. It self-heals when scratched, displaces water on contact, and can be reapplied annually without removing the previous coat. It penetrates into seams and crevices where rubberized coating cannot reach.
Fluid Film 3-Pack Aerosol Corrosion Inhibitor
Fluid Film is lanolin-based — it stays soft, self-heals, and displaces moisture from metal surfaces. Unlike rubberized undercoating, it will not crack or trap water against the frame. The 3-pack of aerosol cans covers a full-size truck or car underbody. Apply to frame rails, floor pan undersides, suspension components, and inside boxed frame sections via the included extension wand.
View Fluid Film 3-pack aerosol on AmazonStep 4: Tire Flat-Spot Prevention
When a tire sits stationary under load, the contact patch flattens against the ground. After approximately 30 days, the tire carcass begins to take a set at the flat spot. This effect is worse in cold temperatures (rubber stiffens) and significantly worse on bias-ply tires, which have stiffer sidewalls than radials. Many pre-1981 classic cars run original-spec bias-ply tires or reproduction bias-look radials that are more susceptible to flat-spotting than modern radial tires.
There are two approaches: inflate tires to the maximum sidewall pressure (typically 35–44 PSI) to reduce the contact patch, or raise the vehicle so the tires are unloaded. Tire saver ramps (also called cradle ramps) are curved supports that distribute the tire load across a wider contact area, preventing the flat spot from forming. They are more effective than over-inflation alone and do not stress the tire carcass.
4Pack Tire Saver Ramps for Flat Spot and Flat Tire Prevention
Curved cradle ramps distribute the tire contact load across a wider area than flat ground, preventing flat spots during months of storage. They are more effective than over-inflation alone and avoid stressing the tire carcass at high pressure. Choose ramps rated for your vehicle weight — most passenger car ramps support 6,000+ lbs per pair.
View tire saver ramps on AmazonStep 5: Moisture Control in Cabin and Trunk
Temperature cycling drives condensation inside the cabin and trunk. Warm air holds more moisture than cold air — when the air inside a closed car cools overnight, water condenses on every interior surface: headliner, seats, door panels, electrical contacts, and the inside of the windshield. Over months of storage, this cycle repeats hundreds of times, creating conditions for mold, mildew, and electrical corrosion. The trunk is particularly vulnerable because it is sealed and rarely ventilated.
Silica gel desiccants absorb moisture from the air inside a sealed space. Place 2–3 large desiccant packs in the cabin (one on the rear package shelf, one on the floor, one in the glove box) and one in the trunk. Silica gel is non-toxic, does not leak, and can be recharged by baking in an oven at 250°F for 2 hours. Avoid calcium chloride-based "DampRid" products inside the car — they collect liquid water that can spill and damage upholstery.
Silica Gel Desiccant Packs (Large)
Silica gel absorbs atmospheric moisture without collecting liquid water, making it safe for interior use. Unlike DampRid (calcium chloride), silica gel packs will not spill or damage upholstery. They are rechargeable — bake at 250°F for 2 hours to regenerate. Place 2–3 in the cabin and 1 in the trunk.
View silica gel desiccants on AmazonStep 6: Covering
A car cover serves two purposes: it protects the paint from dust and UV, and it creates a microclimate around the vehicle. The material choice is critical. Non-breathable covers — plastic tarps, cheap polypropylene, and vinyl — trap condensation between the cover and the paint surface. Every temperature cycle drives moisture through the cover material and traps it against the clear coat. Over months, this causes more paint damage than leaving the car uncovered in a dry garage.
A breathable cover allows moisture vapor to pass through the material in both directions. Water that condenses under the cover can evaporate out through the fabric. Look for covers made from multi-layer breathable fabric (typically polypropylene or cotton blend) with a soft inner lining that will not scratch the paint. The cover should fit snugly to prevent flapping in drafts, which can scuff the paint over time.
Budge Lite Breathable Car Cover
The Budge Lite is a multi-layer breathable polypropylene cover that allows moisture vapor to pass through — it will not trap condensation against the paint like a plastic tarp or vinyl cover. The soft inner lining prevents scratching, and the elastic hem provides a snug fit. Select the correct size for your vehicle to prevent flapping. Budget-friendly compared to custom-fit covers while providing the essential breathability requirement.
View Budge Lite breathable cover on AmazonStep 7: Rodent Prevention
Rodent damage to wiring insulation is one of the leading classic-vehicle winter storage insurance claims. Mice and squirrels enter through gaps in the chassis, firewall, and trunk, then chew on wiring harnesses, upholstery, and headliners to build nests. The damage is often not discovered until spring, when the car fails to start or electrical systems malfunction. The cost of rewiring a classic car can exceed $2,000 depending on the harness complexity.
Prevention is multi-layered: (1) block physical entry points — stuff steel wool into chassis gaps, exhaust pipe openings (remove before starting), and intake ducts; (2) place snap traps or electronic repellents around the garage perimeter, not inside the car; (3) avoid mothballs or dryer sheets inside the cabin — they leave a persistent odor that is difficult to remove from upholstery and may be toxic to pets. Inspect the vehicle every 2–3 weeks during storage for signs of nesting.
Mothballs (naphthalene or paradichlorobenzene) are volatile toxic compounds that off-gas into enclosed spaces. The odor penetrates upholstery, headliners, and plastic components and can persist for months after storage. They are also toxic to pets and children. Use physical barriers and traps instead.
Step 8: Pre-Storage Decontamination and Wash
The final step before covering is the most counterintuitive: wash the car thoroughly, even if it will sit in a garage for months. Contaminants on the paint surface — iron particles from brake dust, tree sap, bird droppings, bug splatter, and industrial fallout — are acidic or caustic. Left on the paint for months, they etch into the clear coat and create permanent stains that cannot be polished out. This is especially critical for cars that were driven through the fall before storage, as fall air carries higher levels of organic contaminants.
Start with an iron remover to dissolve embedded brake dust and rail dust particles that washing alone cannot remove. Iron remover changes color (turns purple) as it reacts with iron particles, confirming contamination. Follow with a thorough hand wash using microfiber applicators and a pH-neutral car wash soap. Dry completely with microfiber towels before covering — any water trapped under the cover will cause water spots.
Adam's Iron Remover (Decontamination Spray)
Iron remover dissolves embedded brake dust and rail dust particles that normal washing cannot remove. These particles are acidic and will etch into clear coat over months of storage. Adam's Iron Remover is pH-balanced and safe for all paint types. Spray on, let it react for 2–3 minutes (it turns purple on contact with iron), then rinse thoroughly. Follow with microfiber applicators for the hand wash.
View Adam's Iron Remover on AmazonThe Rag Company - Premium Grade Terry Microfiber Detailing Applicator Sponges (6-Pack)
Microfiber applicators are soft enough to avoid scratching clear coat during the final hand wash. Use them with pH-neutral car wash soap to remove remaining contaminants after the iron remover step. Machine washable and reusable. Adding these to your cart alongside the iron remover and other items crosses the free-shipping threshold.
View microfiber applicator pads on AmazonRegional Storage Variance
Winter storage is not one-size-fits-all. The climate where you store your car determines which risks are most severe and which steps are most critical. Almost every competing article treats storage as a single set of instructions regardless of location — this section is the differentiator.
Northeast (Road Salt Belt)
The Northeast is the highest-risk storage environment. Road salt is applied from November through March, and salt residue accumulates on underbody surfaces even if the car was not driven in winter. Salt is hygroscopic — it absorbs moisture from the air and creates an electrolyte that accelerates galvanic corrosion on any dissimilar metal junction (steel frame + aluminum components, steel body + chrome trim). Temperature cycling from 50°F days to 10°F nights drives condensation into every seam and crevice.
Priority adjustments: Underbody corrosion protection (Step 3) is the most critical step — apply lanolin coating to all bare metal surfaces, inside frame rails, and on suspension components. Pre-storage wash (Step 8) must include an underbody wash with high-pressure water to remove salt residue. Moisture control (Step 5) is essential — use more desiccant packs than in dry climates. If possible, store on a moisture barrier (polyethylene sheet) rather than directly on concrete, which wicks moisture from the ground.
Dry Southwest (Arizona, New Mexico, Nevada)
The Southwest is the lowest-risk storage environment for corrosion, but has unique challenges. Relative humidity is typically below 30%, which eliminates condensation-driven corrosion but introduces other problems. Leather and rubber components dry out and crack without humidity. UV exposure through windows degrades dashboards, seats, and trim even in a garage with windows. Dust infiltration is constant and can scratch paint if a cover is not used.
Priority adjustments: Underbody coating (Step 3) is less critical but still recommended for any vehicle driven in monsoon season (July–September), when flash flooding deposits silt and moisture. Covering (Step 6) is the most critical step — use a UV-blocking breathable cover even in a garage. Skip the silica gel desiccants (Step 5) — the air is already too dry, and desiccants will accelerate leather and rubber drying. Instead, use a humidistat-controlled humidifier if the garage drops below 20% RH. Battery maintenance (Step 2) is critical — heat accelerates self-discharge, and Southwest garages can reach 110°F+.
Humid Southeast (Florida, Gulf Coast, Carolinas)
The Southeast presents the highest humidity environment. Relative humidity routinely exceeds 70% year-round, and winter temperatures rarely drop below freezing. This means corrosion risk is high (moisture is always present) but salt road damage is minimal. The primary risk is mold and mildew in the cabin, electrical contact corrosion, and condensation inside fuel tanks.
Priority adjustments: Moisture control (Step 5) is the most critical step — use 4–5 desiccant packs in the cabin and 2 in the trunk, and recharge them monthly. Fuel stabilization (Step 1) is essential because humid air introduces more moisture into the fuel tank. Covering (Step 6) must be breathable — a non-breathable cover in 80% humidity will create a greenhouse that grows mold on the headliner. Rodent prevention (Step 7) is important — palmetto bugs and rodents are active year-round in warm climates. Consider a dehumidifier in the garage if humidity exceeds 60%.
What Most People Get Wrong
Three winterization myths persist across most online guides and forum advice. Each one causes measurable damage to stored vehicles.
Myth 1: "Rubberized undercoating protects against rust"
Rubberized undercoating is the most commonly recommended underbody treatment, and it is the wrong choice for winter storage. It applies as a thick tar-like layer that hardens over months. Temperature cycling causes it to crack, and those cracks channel water and salt directly against bare metal while trapping it there — the coating becomes a moisture barrier on the wrong side of the metal. Lanolin-based coatings (Fluid Film, Woolwax) remain soft, self-heal when scratched, and can be reapplied annually without removing the previous coat. If your car already has rubberized undercoating, inspect it for cracks before storage and consider removing compromised sections.
Myth 2: "A plastic tarp is fine for indoor storage"
A plastic tarp or cheap non-breathable cover traps condensation between the cover and the paint. Every temperature cycle drives moisture through the air under the cover, where it condenses on the paint and cannot evaporate. Over months, this causes more paint damage than leaving the car uncovered in a dry garage. Breathable covers made from multi-layer polypropylene or cotton allow moisture vapor to pass through in both directions, preventing the greenhouse effect.
Myth 3: "Start the engine once a month during storage"
Starting a stored engine periodically does more harm than good. A cold engine started for 10–15 minutes does not reach full operating temperature, so combustion byproducts — water vapor and unburned fuel — condense in the crankcase and exhaust system. This water mixes with oil to form sludge and accelerates bearing corrosion. The exhaust system never gets hot enough to evaporate the moisture, so it pools in the muffler and catalytic converter, causing internal rust. The correct approach is to leave the engine alone during storage, with stabilized fuel and a battery maintainer connected. The engine will be in better condition in spring if it was never started than if it was started monthly.
If you are storing a vehicle for more than 6 months in a humid climate, consider fogging the cylinders with storage oil before parking. Remove the spark plugs, spray fogging oil into each cylinder, turn the engine over by hand to coat the cylinder walls, and reinstall the plugs. This creates an oil film that prevents surface rust on cylinder walls and valve seats during extended storage.
Sources & References
- Hagerty — How to Store Your Collector Car — Insurance provider storage guide covering moisture, battery, and fuel recommendations
- Battery Council International — Battery Technical Manual — Industry standards for lead-acid battery maintenance, sulfation, and storage
- Tire Industry Association — Tire Storage Guidelines — Technical bulletin on flat-spotting, temperature effects, and storage position
- Fluid Film — Technical Data Sheet — Lanolin-based corrosion inhibitor specifications and application guidelines
- STA-BIL / Gold Eagle — Fuel Stabilizer Technical Documentation — Fuel stabilizer formulation, storage duration claims, and application rates
- Related: Classic Car Restoration Cost Calculator (2026) — Interactive calculator for estimating restoration costs including storage-related expenses
- Related: Car Restoration ROI Calculator — Calculate return on investment for restoration projects including winter storage costs
- Related: Classic Car Paint Codes & Trim Restoration — Paint code decoding and trim restoration guide — relevant for pre-storage paint decontamination